We received the manual in a timely manner and it was exactly what we were expecting. Excellent replacement for original Service Manual.
All schematics are very legible. We are really satisfied.
We received the manual in a timely manner and it was exactly what we were expecting. Excellent replacement for original Service Manual.
All schematics are very legible. We are really satisfied.
Great PDF easy to read good info needed for replacment of belts and assembly and specs.
Text excerpt from page 5 (click to view)
2-1
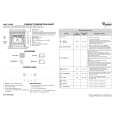
DISASSEMBLY INSTRUCTIONS
Dismantling the Grille Frame Assembly
1. Place the Subwoofer Box as shown in the Picture 1 and pull to force open the Grille Frame Assembly. Caution: Take care the surface when take out the Grille Frame Assembly of Subwoofer.
Dismantling the Rear assembly
1. Loosen 8 screws A as shown in the Picture 2 (Rear View) to pull out the Printed Circuit Board assembly. Caution: Do not break the bundle of wires to the front.
A
Picture 1
Picture 2
Dismantling the Front Assembly
1. Place the Subwoofer Box as shown in the Picture 3 and use a screw driver to force open the front assembly. Caution: Do not break the bundle of wires to the front. Take care the surface when take out the front panel of subwoofer
WARNING: THERE IS ONLY A LED BETWEEN THE FRONT PANEL AND WOOD BOX. IF NOT NECCESSARY, PLEASE DO NOT TRY TO OPEN THE FRONT PANEL!!!