Awesome quality manual. You really saved my bacon with this one. Was looking for some specific information with regards to my "new" vintage VCR that didn't come with the owners manual. This site is truely a goldmine of available manuals. The quality of the scans are top notch.
Thank-you so much for this awesome manual. If you're looking for this Sony SL-HF400 owners manual, this is the one you NEED to buy. Definitely worth the money.
The manual was made available promptly. I is a clean scan of the original. I had no problem downloading it. The scan was well centered and cleanly formatted. It is as good a product as can be had without being the original document.
Received downlink in less then 8 hours, Item was in good copy condition, and told me how to program the clock timer. The price was very resonable, and the process was very automated and was GREAT to work with.
I was very pleased with the manual I got for my amateur (ham) radio. Without it I could not figure out how to input and/or change the P/L setting on my radio. It drove me nuts as the radio was essentially useless. That all changed when my manual came. Then it took only minutes and I was done. Now my radio works fine. This is an exceptionally good resource as it's a very easy and user friendly download. Thank you very much! Dziękujemy za!
Text excerpt from page 13 (click to view)
mrd250book 2/14/03 10:49 AM Page 13
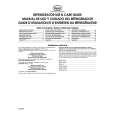
Hookups - TV (cont�d,) 13
Connecting to a TV with an S-Video In jack
2
CENTER LINE OUT AUDIO OUT AUDIO IN VIDEO OUT
1 3
AM/FM ANTENA FM (75�)
L
R
FR FL C
SPEAKERS
AM S- VIDEO OUT
SR
(8�)
SL
WOOFER LINE OUT
TV
AUX
Pr/Cr
Pb/Cb
Y
COAXIAL
OPTICAL
COMPONENT VIDEO OUT
DIGITAL OUT
1 2 3 4 5 6
Connect the DVD Receiver�s S-VIDEO OUT jack to the S-VIDEO IN jack on your TV. You will need an S-Video cable (not supplied). To hear TV channels through the DVD Home Cinema System, connect the supplied red and white audio cables to the DVD Receiver�s red/white, right/left AUDIO IN jacks and to the TV�S right/left AUDIO OUT jacks. Match the cable colors to the jack colors. Connect the power cords of the DVD Receiver and TV to a power outlet. Turn on the TV and set it to the correct S-Video In channel. Go to the lowest TV channel and change channels down until you find the S-Video In channel. (It is not channel 3 or 4 as it might be when using a VCR.) See your TV owner�s manual for details. Press STANDBY-ON y on the front of the DVD Receiver to turn on the DVD Receiver. The red Standby light will disappear. It is not necessary to set VIDEO OUT to S-VIDEO. S-VIDEO is the DVD Receiver�s default setting. However, if your picture is distorted, check the VIDEO OUT setting. Make sure it is set to S-VIDEO. Details are on page 22.
Helpful Hints
� You only need one video connection between the TV and the DVD Receiver. You cannot use SVideo and Component Video at the same time. � If you used the yellow VIDEO OUT jack on the DVD Receiver to connect it to the TV, you do not need to adjust the VIDEO OUT setting.